The below wiki article is based on user submitted content. Please verify all hyperlinks and terminal commands below!
See a mistake? Want to contribute? Edit this article on Github
If you are unable to find the answer to your question, please join our Discord server for support: Discord Server

Could also show up as “MSVCP140_ATOMIC_WAIT.dll was not found”.
Current versions of yuzu require the latest versions of Microsoft Visual C++. Please download and install the following dependency:
https://support.microsoft.com/en-us/help/2977003/the-latest-supported-visual-c-downloads
Go to Visual Studio 2015, 2017 and 2019, and select the link next to x64.
You are legally required to dump your games from your Nintendo Switch. To do so, please follow our in-depth Quickstart Guide.
Yes, but support for those models is beyond our scope since they require hardware-based modifications to load custom firmware. We still recommend obtaining a Switch console that is vulnerable to the fusée-gelée RCM exploit, as it’s still the most accessible way for jailbreaking. To check if your Switch is hackable using this exploit, visit Is My Switch Patched? and enter your console’s serial number.
This problem indicates that the Vulkan initialization failed on the previous boot of yuzu. Please perform the following:
If issues persist, please reach out for support via our Discord server or our Forum.
yuzu requires console keys to play your games. Please follow our Quickstart Guide to dump these keys and system files from your Nintendo Switch.
These console keys (prod.keys/title.keys) need to be placed in the following directories:
You may need to create the following “keys” folder:
C:\Users\USERNAME\AppData\Roaming\yuzu\keys/home/USERNAME/.local/share/yuzu/keysNOTE: This yuzu directory can be quickly accessed by selecting file/open yuzu folder within the emulator
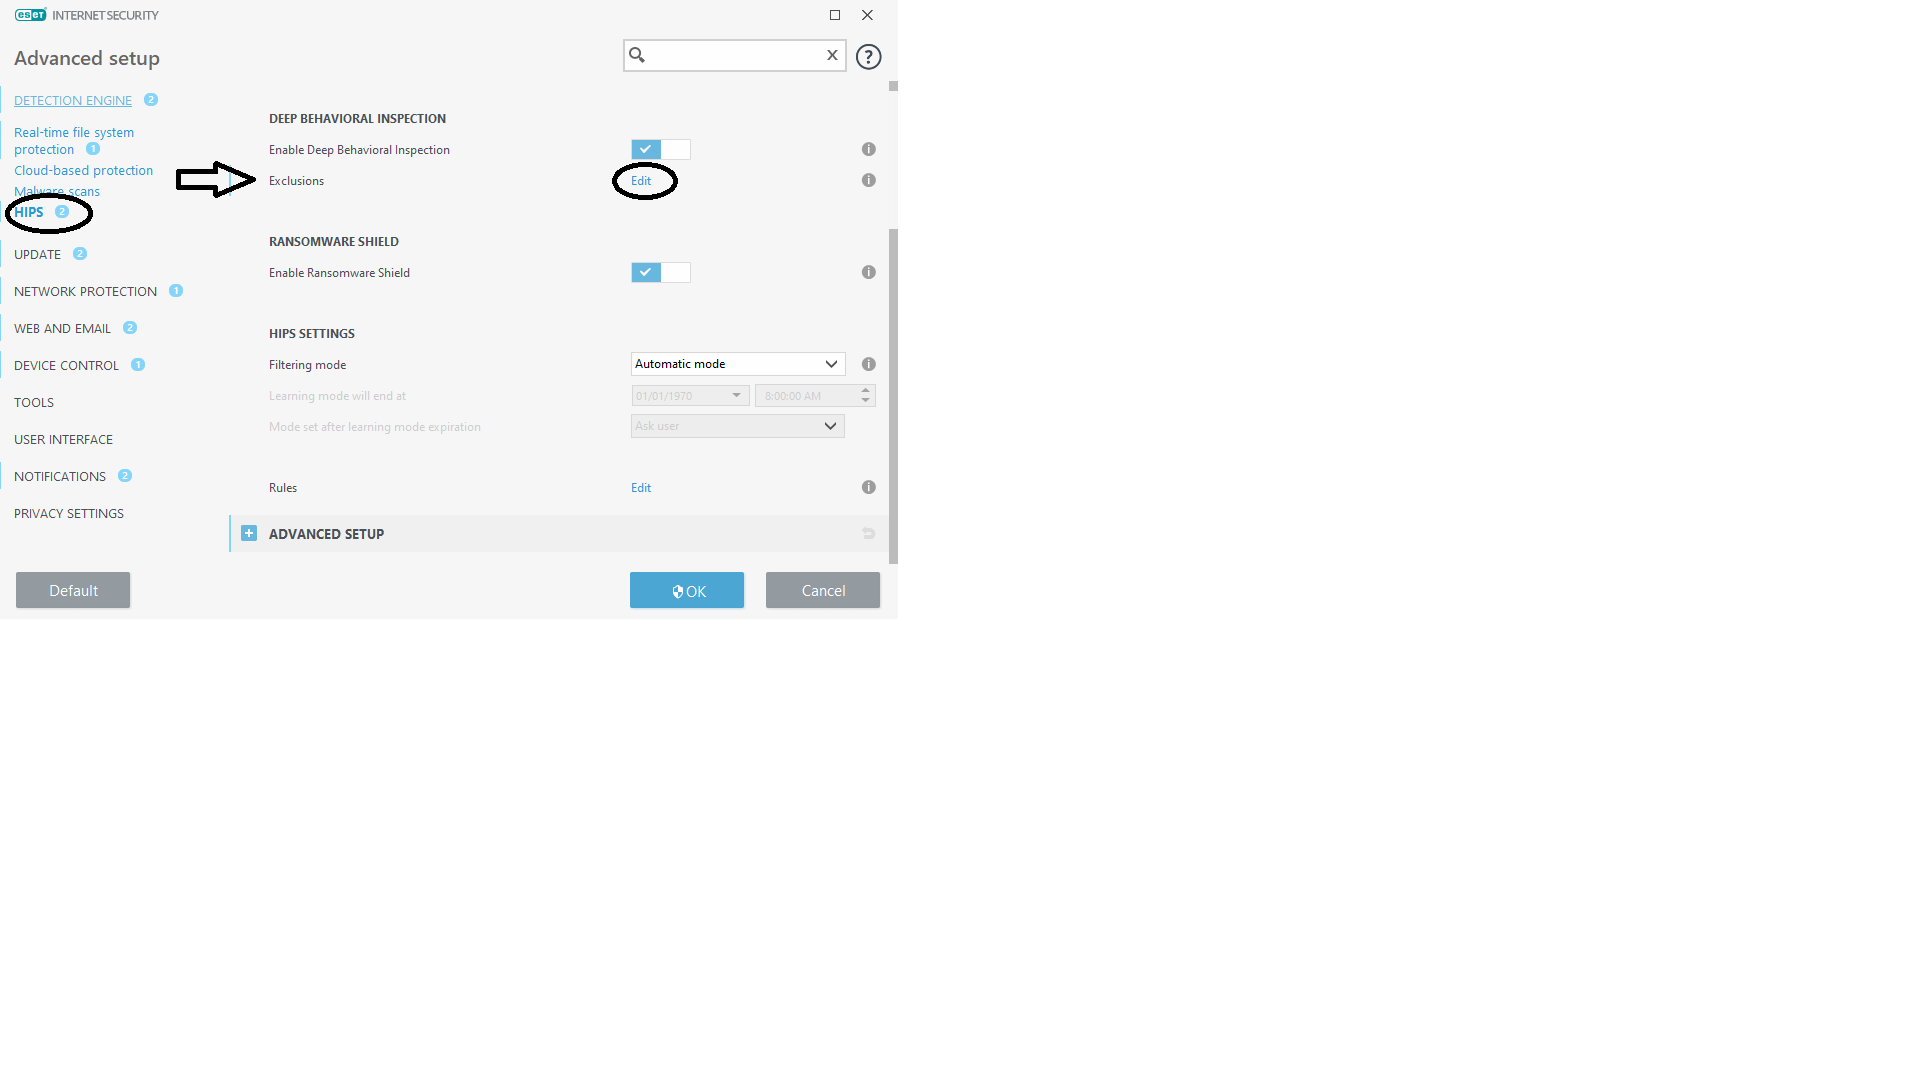
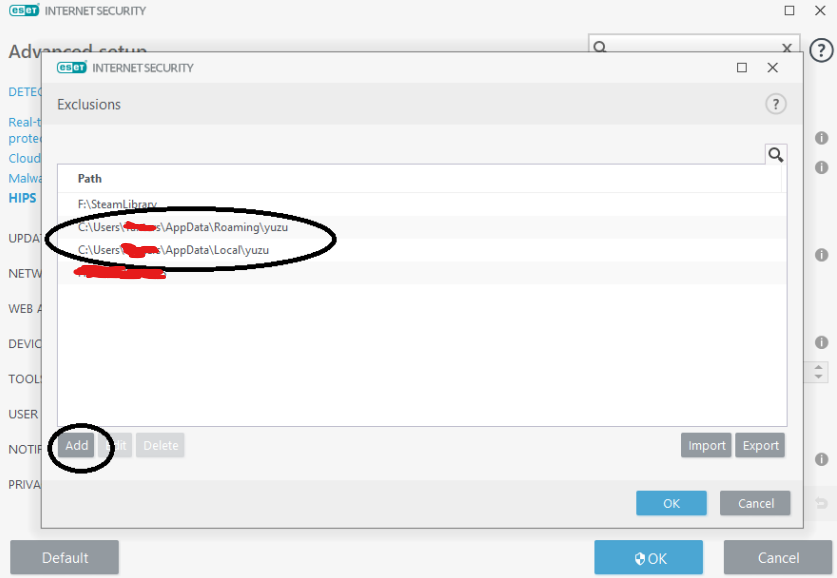
This problem is usually caused by a false positive of your antivirus software, most commonly by Avast and AVG. These applications will often incorrectly detect yuzu as malicious software and delete the executable as a result.
You can confirm it is a false positive with an online scanner, such as VirusTotal if you wish.
To fix this, you’ll need to either disable or uninstall your antivirus software. Make sure to reboot if you choose to uninstall it.
Afterwards, follow the instructions below for yuzu will not update further or starts with a Qt platform error to delete any residual files of the failed installation.
%localappdata% and press Enter.yuzu folder and delete it. If it is being used by another process, please double-check that you do not have any yuzu related applications running.Note: Doing this will not touch your existing keys - saves for yuzu, as they reside in %appdata%\yuzu\ not localappdata yuzu folder.
This problem may be caused by a corrupt configuration file.
Press Win+R, type %appdata%\yuzu\config and delete the qt-config.ini file. Your global settings will be lost after doing this, reconfigure accordingly.
Alternatively, some screen recording applications use dubious methods to inject themselves into software, causing crashes. Some examples are Reshade, GShade, Bandicam, Action and Screenrec. Uninstall the software if you have it installed. For Reshade-GShade if you need to keep it installed at the very least turn off its ability to touch Vulkan globally on windows to allow Yuzu&Vulkan to work again.
We recommend using OBS Studio, Radeon ReLive, Nvidia ShadowPlay or Microsoft XBox Game Bar.
Overwolf is also a known cause of issues, we recommend avoiding it.
You are likely experiencing Shader Caching. Shaders are small programs running on a graphic card, responsible for rendering graphics like terrain, explosions, characters, etc. Since a PC cannot directly execute switch shaders, it first has to translate them to a format a PC can understand. This translation process is time consuming, and you’ll notice it in two ways:
While playing, if yuzu needs to translate a new shader, the game will stutter. Loading into a game for the first time can give long freezes due to the number of shaders. As you keep playing, the amount of stuttering will decrease.
When launching a game, the shader cache is loaded. To speed up this process there exists an additional “precompiled” cache. This cache may get reset every time you update yuzu or install a new GPU driver. The precompiled cache will then be compiled from scratch, causing a longer load time.
Vulkan and OpenGL have separate caches, but different OpenGL backends share the same cache. This means that on Nvidia you can build up shaders with less stutter on GLASM, then use GLSL for more performance.
IMPORTANT: Since the cache stores parts of the game, we don’t condone sharing or downloading these, since it is considered piracy.
For a list of useful mods for your favorite games, check our database with Switch Mods
To add mods to a specific game, simply right click the game in yuzu’s games list, select Open Mod Data Location and structure your mod files similar to this example:
Mod directory/mod name/romfs
or
Mod directory/mod name/exefs
To add cheats, structure your cheat file similar to this example:
Mod directory/cheat name/cheats
An example of a correctly structured mod directory can be seen below:
The mods provided on our Switch Mods page are already structured accordingly and only need to be extracted into the mod directory folder as is.
Once added to the correct mod directory, simply right click the game again, select properties and activate the installed mod. The same process can be followed in reverse for de-activating mods
Installing updates and DLC is simple. In the top left corner of the emulator window, select File / Install Files to NAND, then select the file you wish to install. Once installed, your files should load automatically and the installed update or DLC will be shown in the games list add-ons column of the corresponding game.
If you wish to activate/deactivate a specific update or DLC then right click your game in the games list, select Properties, then enable or disable as needed.(See Below)
Reinstalling or Overwriting Updates/DLC is as simple as following the above instructions, selecting your files and installing your Update/DLC. When doing this, any previously installed files will be removed and replaced by the newly installed versions.
To delete your installed game Updates or DLCs, right click your game, then select Remove. From here you can delete/uninstall your game Updates and DLCs from the options list (See Below)
Since the Nintendo Switch is a complicated device controller input wise, you will need to change some input settings depending on the game you wish to play.
Open the yuzu settings and go to Controls.
For all games other than Pokemon Let’s Go set the controls like this:

Connect Controller if it is not already checked.Pro Controller in the combobox below if needed (this is also the default).Input Device.Defaults button on bottom right sets default keyboard mappings.OK.For Pokemon Let’s Go set your controls like this:

Connect Controller if it is not already checked.Handheld in the combobox below.Input Device.Defaults button on bottom right sets default keyboard mappings.OK.The GameCube adapter communicates with yuzu over the libusb protocol. This works natively on Linux, but requires the installation of a compatible driver on Windows using Zadig.
Plug in the GameCube controller adapter if it hasn’t been already. Download and launch Zadig.
If you’re using the Mayflash adapter, make sure you switch it to Wii U or Zadig won’t pick it up properly.
From the Options menu in Zadig, select List All Devices
In the pulldown menu, select WUP-028. Ensure that its USB ID is 057E 0337.
WinUSB then click Replace Driver. Select Yes to modify the system driver.When the notification that the driver is installed successfully is displayed, you can close Zadig and continue to configuring the controller with yuzu.
Ensure the adapter is plugged in prior to launching yuzu. Then follow the How do I set up my controls? instructions, selecting Gamecube controller X as the Input Device, where X is the port in which the controller is plugged into.

To add a save, simply right-click your game in the Games List, Select Open Save Data Location, then Select your User from the Profile Selector


Once your Save Data Location is open, place your applicable game save in the folder presented to you.


This typically occurs when yuzu runs out of RAM. Increase the size of your pagefile to resolve the issue.
Please read the following article: Boxcat
Please look up your error in the following page: Error Codes
Please read the following article: Mods
Please read the following guide: How to Upload the Log File
Please read the following article: What is Telemetry?
Please read the following guide: How to install Early Access
yuzu is an experimental open-source emulator for the Nintendo Switch from the creators of Citra. It is written in C++ with portability in mind, with builds actively maintained for Windows and Linux. The emulator currently can play various commercial titles and homebrew applications with varying degrees of success.
yuzu is an open-source project, licensed under the GPLv2 (or any later version). Refer to the license document for more information.
yuzu is actively tested and supported on various 64-bit versions of Windows (10 and up) and Linux. macOS is no longer supported due to Apple deprecating OpenGL.
yuzu currently requires an OpenGL 4.6 capable GPU and a CPU that has high single-core performance. It also requires a minimum of 8 GB of RAM. For more details, see our Quickstart Guide.
Take a look at the following guides for steps on building yuzu for the following platforms:
yuzu has an active team of open-source developers. The list of contributors can be found on GitHub.
Advertisement
Advertisement